What are the warranty conditions on a Goodall Guitar?
Your Goodall Guitar has a five year warranty on materials and workmanship from the date of purchase. If the instrument has been damaged or cracked from improper care and/or abused, such as overly dry humidity (less than 35%) or overheating, we reserve the right to charge some for repairs. If the instrument is damaged from rough handling or accidental damage such as being dropped or from shipping damage, we will charge accordingly. Normal fret, fretboard, nut, saddle and case wear are not covered under our warranty.
We do like to take care of our first owner customers. After five years, if the instrument has been properly cared for, we will extend the warranty at our discretion. If a warranty issue arises a guitar can be returned to us with a return authorization. The instrument needs to be sent to us at the owners’ expense. Goodall Guitars is responsible for return shipping for warranty repairs only.
A skilled local repair-person should see your instrument occasionally, especially after the first few months. This is to make sure the action adjustment is proper for you and that the action isn't left too high causing extra stress on you and the instrument. This is at your expense but the expense is very minimal. The store you purchased the instrument from will do this at no expense but this is not always possible.
The warranty in not transferable, but as a rule we don't have problems with our instruments unless they are not cared for in regards to humidity, heat or accidents.
My guitar's top seems slightly deformed around the bridge, what's going on?
Your Goodall is absolutely perfect and exhibiting normal behavior. I know what you are seeing and feeling but it is completely normal and desirable to have this slight deformation. We have been building 'world class' instruments for over 35 years and we can not and will not build instruments without this slight deformation. It is not, I repeat, it is not an abnormal issue or an issue that will cause any trouble in the future.
We do not build our instruments too lightly and sacrifice structural strength but we also do not overbuild them to prevent this slight top deformation. Indeed some slight top deformation is entirely necessary for great tone production! There is about 160 lbs of tension exerted on the top from the strings so some top movement is absolutely normal. The wood is very strong and will tolerate this just fine. Please do not worry, or feel that your instrument may be exhibiting a problem.
What kind of strings should I use?
We send almost every instrument out with the light gauge (.012" - .053") Elixir Phosphor Bronze 'Nano Web' strings. We really like them but some folks don't like the sound of coated strings, and there are many other good brands. Elixir also makes a thicker coated 'Poly Web" string we don't like it as much. I think D'Addario EJ16 Phosphor Bronze are a good alternative. Our instruments work great with light gauge strings.
Medium gauge strings (.013" - .056") are only suitable if your guitar has a Sitka, European, Italian, Adirondack spruce or Port Orford cedar top. You can determine the species of top on your guitar by sighting into the sound hole up towards the neck mount inside the guitar. The wood label will tell you what woods your guitar is built from. If you own a Baritone model, your guitar comes standard with medium gauge Elixir strings.
How do I go about installing a new saddle?
Installing a new saddle is not "drop in" situation. Sometimes just a thin ebony shim under the saddle is satisfactory. Each saddle is custom fit to the existing saddle slot in each individual instruments bridge and should fit so as to be snug, definitely not loose. The bridge saddle slots vary in width by as much a .005" (.13mm) but the saddle should fit to within 001" (.02mm). Not over tight or wedged in but tight enough to almost need pliers to aid removal. This is very important so as to transmit the string vibrations directly to the bridge and top without tonal loss. The saddle and bridge area is definitely one of the most important for tone!
The saddle also needs to be adjusted for each instrument as to the correct treble and the correct bass height. So just sanding evenly off from the bottom is hit or miss in achieving the correct action height. We like (after the correct relief) .070" (1.82mm) treble and .094" (2.41mm) bass to the top of the 12th fret.
I recommend leaving the action on the slightly high side and going slowly when lowering otherwise tone can be diminished even before buzzing occurs.
When installing the strings and tuning up for the first time with a new saddle, tighten the strings about half way and adjust the strings for even spacing over the saddle top and inline with the relief slots behind the saddle. Otherwise the strings will set into the saddle with an uneven spacing and will be always forced to set unevenly because the strings notch the top of the saddle the first time they are tightened.
Usually the reason someone wants a new saddle is that the action was lowered too far causing unpleasant buzzing to occur! Sometimes releasing tension on the truss rod of a neck (one that is too straight or flat) will be all that is needed to correct buzzing. A neck with the proper relief will allow the bass strings to oscillate without damping and buzzing and also makes the higher notes easier to fret. This is because the higher the note and the shorter the string, less relief (slightly) from the fretboard is necessary. Find out more about action height on our Guitar Care page.
The other reason a saddle is needed is because the instrument has been dangerously dried out too much in low humidity causing the top to drop down and perhaps go concave and lowers the stings toward the frets. If there are sharp edges on the frets and buzzing of the strings on the frets which didn't happen previously the instrument has been over dried! An over dried instrument can crack and must be re-humidified to at least 40% relative humidity. Find out more about humidity on our Guitar Care page.
Is there something wrong with my guitar's intonation?
Our instruments are as perfectly tuned as possible. The frets are in exactly the right spots and the saddles are carefully intonated for best tuning. But there are a few things to check for that can cause intonation problems.
Using a capo will almost always cause tuning issues. It stretches the strings unevenly causing more sharpness in the fatter wound strings relative to the thinner treble stings. The solution is to make sure the capo is just barely tight enough to fret the string but no more. Also, install it absolutely as close to the fret as possible. This procedure will minimize the tuning problems. Some re-tuning still may be necessary but probably not.
Other important tuning issues are:
- Make sure the saddle wasn't installed backwards. This seems silly but someone brought me a Goodall recently like this! Our saddles are very carefully compensated for each individual string and installing them backwards will prevent correct tuning.
- Learn to use octave tuning to the fundamental of the string instead of the 5th and 7th fret harmonics tuning! Playing the harmonics sounds cool and seems easier to hear the 'beats' but will mislead your ear to improper tuning of each strings fundamental note causing tuning discrepancies. Using a good quality tuner is of course the alternative but there is no substitute for training your ear to tune as well.
- The action must not be left too high with heavier strings. This can cause intonation to be increasingly off as one plays up toward the bridge as the strings stretch to the frets. The remedy is to have the action lowered, truss rod adjusted and/or use a slightly lighter gauge of strings.
- The next problem is very rare and should be checked by a professional if you suspect that it is the issue. The strings must be seated at the very front of the nut where they release to the fretboard or it can cause intonation issues most noticeable between the open strings and first, second or third fret (fretted) strings. This can also cause a faint Sitar like 'zing' when the treble E and B strings are plucked as well. This can be checked by loosening the string a bit and lifting the string out of the nut slot and looking for a tiny dark spot where the string rubs. That dark spot must be at the front of the slot where it releases toward the fretboard. If the dark spot is slightly back from the front of the slot, the nut slot should be filed slightly to cause the strings to seat where they release toward the fretboard. The idea is not to lower the slot, just relieve it a little more at an angle parallel to the peghead face. Like I say, this is probably not an issue because we are very careful to file the nut slots correctly.
You may need a repair tech to check both these last issues. Contact your local dealer for help locating a good repair technician.
Over the years, I have had two or three guitarists inquire concerning what they feel is chord dissonance on a Goodall guitar. These folks have a very sensitive and discerning ear and may be noticing chord dissonance induced by the ‘Equal tempered’ fret placement. This may be a blessing and a curse! Unfortunately, fretted instruments have a built in compromise in the placement of the frets to maximize flexibility in chord playing within any given musical key. A slight mistuning of each scale interval is induced for each string.
If we were to construct an instrument with the ‘Just scale’ placement of frets, each string would have a slightly different placement of frets than the next and the notes of the strings could not be changed. We could only tune it to play in one or two keys to obtain perfect musical intervals within a very limited number of chords. If the guitarist adventured out of those few ‘Just tempered’ chords, the instrument would be horribly out of tune. Obviously we have no choice but to use the ‘Equaled tempered’ scale.
In addition to the ‘Equaled tempered’ fret scale compromise, our instruments have considerable overtone harmonics (probably more than most guitars). Overtone harmonics are not perfectly in tune with the fundamental of the note. This issue may also add to the perception of the guitar being slightly out of tune.
The ‘Equaled tempered’ scale is absolutely necessary for allowing the guitarist to play in any musical key and shift in and out of any key with reasonably correct tuning but not perfect. Remember, this is an issue regarding chords, not individual notes, because the individual strings and twelfth fret harmonics on each individual string are perfectly adjusted on our instruments.
Another thing I feel compelled to explain is that our instruments have such a wide harmonic range that folks are actually hearing some of the out of tune harmonics. It may take a few weeks to adjust one ears to this. Instruments with a duller tone and less harmonics definitely seems easier to tune as one doesn't hear the need to tune as carefully. Just relax and enjoy the extended tonal and harmonic palette of your Goodall guitar!
I've noticed a buzz, how should I go about locating it?
Some buzzes can be rather elusive. Most are caused from action that is just too low and or from a neck that is too straight (no forward relief). Open tunings (slack key) will also accentuate low action buzzes. You can find out more about action height adjustments on our Guitar Care page.
Even though the buzz may sound like it is in the bridge area it could be coming from somewhere completely different! It probably is not a loose brace, but if it is, the buzz will stop or diminish when touching the top or body in that specific spot.
Here's what you should check first:
- The pickup end pin jack can rattle/buzz if it is slightly loose.
- The tuning machine nuts can cause a buzz is they are a bit loose.
- The truss rod should be at least slightly tight against it's seating slot. If it's a bit loose, the washer can rattle/buzz.
If you and your repair person are unable to locate the buzz, and these tips have not helped, we recommend you might want to just move past fixating on it. Please resist the temptation to fuss over every slight string buzz. It is part of the package with an acoustic guitar. Some folks have literally fussed themselves into a state of mind that ruined their ability to enjoy their fine instrument. If you still feel certain that something is wrong even after checking out everything above, we will of course be glad to assist you so feel free to contact us.
Why don't my bridge pins fit correctly?
We try to find bridge pins of the same size so they should be close to each other, but there will always be some variance. Use the guide that follows to figure out which pins match which pin holes. In the future, we recommend keeping the pins in order as you remove them from their holes so that you can replace them with ease.
First take all the strings off (and all the bridge pins out) and put them in the holes until they fit best without the strings. Push evenly with a medium light pressure. You can tell that the pins are likely in the correct holes when they all seat at nearly the same height with even light pressure used to insert them. The low E string usually has a slightly larger string relief slot to accommodate the larger E string diameter, otherwise the low E pin can be prevented from going all the way down with the string in place.
If we send you a replacement pin, unfortunately we don't know what the overall size is because they vary quite a bit.
My guitar's finish isn't perfectly flat anymore, is this normal?
Beautiful finish is very important here at Goodall Guitars. I spend about three hours on every instrument, leveling, sanding with successively finer grit papers, and laboriously buffing till they look like glass. When the guitar left the shop it was absolutely perfect without any shrinkage or dimpling whatsoever. And, our instruments are left for plenty of time for the finish to cure. Depending on the species, wood has fairly deep pores that need to be filled will a special paste filler and sealer before the top coats are applied. It is normal for the filler to shrink down a tiny bit into these pores over time. And because our instruments have thin finish for great tone, the thinner the finish the more this miniscule shrinkage will show. The human eye can see that shrinkage if it is even one-half of one thousandth of an inch deep! Our finish will also let the wood telegraph through to the surface a bit over time. It shows especially on the top of the guitar because this finish is even thinner and because the top soft wood moves more than the body hardwood. This can be a good thing because if the instrument is not humidified properly it will show low humidity 'puckering' on the surface. Almost like a vampire had sucked the life out of the wood. Cracks and damage are sure to follow.
Folks are getting used to seeing mass produced guitars and other items coated with thick finish now days but vintage guitars had a great deal of this shrinkage.
How should I repair minor finish damage?
We repair small, shallow dents and dings in our urethane finish with cyanoacrylate (super glue). It works incredibly well, but the area must be prepared first by fine sanding on the damaged spot with 600 grit paper, then applying the thinnest glue so it will penetrate and bond properly. There can be no shiny areas even down in the depression of the dent or it will not bond enough. If there is any de-bonding of the finish in the dent area a bit of careful probing with an E-xacto knife when applying the super glue will allow the glue to wick into the loose area as well. Don't apply too much glue - just a little more than necessary to fill the dent. Apply more afterward if needed to fill completely.
After the glue sits a couple minutes, a very light spray of accelerant over the glue kicks it off to cure. I imagine your guitar tech knows how to use super glue and accelerant.
If I'm repairing a crack, the glue will migrate up into the crack in an amazing way to repair but I then use a bit thicker super glue on the top to prevent starvation of glue in the joint.
Once cured, the leveling process is very important before buffing because the super glue is really hard. If sanded improperly, there will be a high spot where the glue was applied and a low area all around it after buffing. To get it done properly use a utility blade with masking tape on both ends, so that the area in the middle is left un-taped, as a scraper to level the touch-up area. Then use tiny hard sanding blocks with ascending 1000, 1200, and 2000 grit papers and finally buffing the area.
How low can I adjust my action height?
Extra low action prevents the plucked strings from oscillating as far as a higher action allows. It hurts fullness and chocks the dynamic range. The strings are hitting the next fret above the fret which is being fretted. Even if you don't hear any actual buzzing it can actually be diminishing tone. The trick is to go as low as your playing style allows. Very light players with a timid dynamic range can go as low as .060" treble E string (to 12th fret) and .090" bass E. We set our new instruments up to .070" and .095" but it is conceivable some hard players can need an action height of .080" to .105"!
That is why I worry a little when I hear about guitar tech's lowering the action on our guitars - I have seen far too many instruments set lower than is correct. A good tech will educate and confer with the player before randomly lowering the action, and they should have set limits and take accurate measurements before-hand. Of course, for ease of playing, the player usually wants the strings laying on the frets. Resist that temptation!
Also dry weather lowers action and humid weather raises action because the top rises and lowers a considerable amount summer to winter depending on where one lives. Care should be taken in dry weather to properly humidify as well!
Can I use heavy gauge strings on my Baritone model?
The idea behind the Baritone is to be able to tune lower without using too heavy a string. I think with plain medium gauge strings (.013" - .056") the 2-1/2" extra string length on your Baritone should carry the C to C tuning. Remember, some folks manage tuning that low with 25-1/2" string length instruments.
I personally like our Baritone guitars tuned D to D (the standard tuning for these models) with medium strings and dropped tuned a little from there if desired. It's also very versatile because with a capo at the second fret, it is instantly transformed into a 12 fret neck Long Dreadnought model at standard pitch!
The D'Addario heavy gauge strings for regular steel string acoustic guitars (.014" - .059") are a good choice for your application IF medium gauge strings feel too loose for you at the B to B tuning. Those strings are definitely too heavy for the D to D standard tuning we recommend, however at the C to C tuning they would be okay.
I think heavier 'Baritone' strings sound dull and thumpy, almost bass guitar like. This loses much of the beautiful, transparent, clear and resonant quality I'm trying to achieve with our Baritone model. Also, the nut slots and bridge slots would need opening up.
Too heavy a string gauge tuned to an overly high a pitch will void the warranty for structural damage reasons.
What tools do I need to adjust my truss rod?
The tool needed for this adjustment is a 1/4" 'nut driver' wrench available at any hardware store such as Ace. They used to be small enough to fit, but recently many driver brands seem a little too large and some grinding on the outside diameter may be necessary. The luthier supplier Stewart MacDonald www.stewmac.com 800-848-2273, has a 1/4" thin-wall truss rod wrench that will fit as well. A small, tight fitting Phillips screwdriver for the truss rod cover screw is also important so that you don't cam out and damage the screw head, or scratch your peghead.
You can find more information and recommendations regarding action height adjustments on our Guitar Care page. Please be sure that you are knowledgeable in guitar repair and action adjustment before attempting to adjust the truss rod yourself. If in doubt, seek assistance from a professional.
How do I install a new pickguard?
Removal:
The clear pickguard can be removed easily if you start by carefully lifting the side near the end of the fretboard with a thin pick and peeling very, very slowly. A bit of paint thinner or naptha on a soft cloth or soft paper towel can be used to remove any remaining glue residue. Don't rub too hard or the finish will scratch.
Installation:
With a soft cloth remove all polish and wax in the area the pickguard is to be installed. Use a small amount of paint thinner or Naphtha for this process. Make sure the area is completely dry and completely dust free and do not let dust get under the surface of the pick guard when installing. You only get one shot at the installation and wax, dust, fingerprints or misalignment will ruin the pickguard installation.
Before removing the release paper backing, pre-determine the correct placement of the new pickguard by aligning it with the strings and the grain of the top visually/aesthetically. The inside radius of the pickguard must be carefully aligned with the outside of the large rosette ring. Place a couple of pieces of temporary masking tape to show where the final placement should be.
Remove the paper backing from the pickguard. Be very careful not touch the adhesive side with anything but smooth release paper. Place two small release paper tabs back on each end of the pickguard. By doing this it will enable you to grab and align the pick guard with the designated location marked by the masking tape. The placement has to be perfect BEFORE you adhere the pickguard to the guitar. While holding the release paper tabs, align the pick guard placement, and let it sag slightly in the center to begin the application. Start adhesion from the center only. Be sure to leave the release paper tabs on until the pickguard is applied and smoothed to within about 1/2" from the tabs then remove the tabs by pulling directly away from each of the pickguard. This helps prevent bubbles from being trapped during application. Rub across the narrow part of the pickguard with your thumb in both the left and right direction. Go SLOWLY. If a bubble starts, stop rubbing and let it set for five minutes then repeat the application process applying pressure slowly in both directions with your thumb.
When the pick guard has been applied, take the release paper, which was removed from the pickguard back and align it perfectly over the new pickguard. With a medium guitar pick rub through the paper over the pickguard to secure it in place and to remove any remaining tiny air bubbles not removed by the thumb rubbing. Be careful when doing this process not to rub too hard on the extreme edge of the pickguard or go off the edge of the pickguard and dent the top.
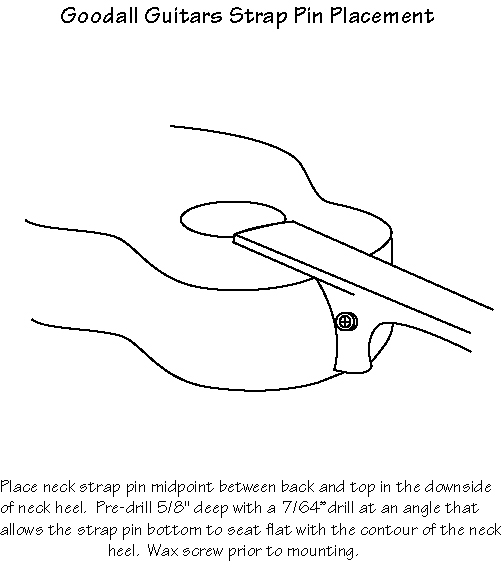
How do I install a strap pin?
We recommend that you have a professional repair person do the neck strap installation. However, if you are confident in your abilities, please use the instructional diagram below.